A couple of months back Kyle Jepson (Senior Inbound Sales Professor at HubSpot) shared a video explaining how to use HubSpot’s new automation features to add an amount of time to a date property. This got me thinking about a post I had read on the HubSpot Ideas forum a little while back.
The general gist of said post is that, given the limitations within HubSpot for customising meeting notifications, it would be useful if HubSpot added a meeting time property / personalisation token that could be used inside of emails. This would allow HubSpot admins to configure and send personalised / branded confirmation or reminder emails that include both the date and the time of an upcoming meeting (which isn’t currently possible).
Although Kyle’s original video was about how to add a unit of time (1 day / week / year) to an existing date property, it made me wonder whether it would be possible to use the data formatting features in HubSpot workflows to record the actual time of a specific event (in this case a meeting), and I’ve spent the last couple of weeks tinkering with a few different ideas.
The good news is that there is a solution for this, and it can be built using some custom properties and a pretty simple workflow.
The bad news is that the workflow features you need are only available in Operations Hub Professional, so you’re going to need to pony up an extra £650 /mo if you want to leverage this idea.

How it works
The bare bones of what you need to do is create three custom properties and then build a workflow that copies the value from the Date of last meeting booked in meetings tool property, splits it into two values (date and time), reformats those two values and then stores them in two separate custom properties. You can then use those properties as personalisation tokens in any follow-up / reminder emails that you want to send.
To get started, the first thing you’ll need to do is create three custom contact properties. Head on over to Settings > Properties and then under Select an object: make sure you’ve got ‘Contact properties’ selected. Tap that orange Create property button in the top right corner, and add the following custom properties:
- A single-line text property called ‘Meeting time’
- A single-line text property called ‘Meeting date’
- A date picker property called ‘Meeting datestamp’
It’s worth mentioning that, depending on how sophisticated your use of HubSpot’s meetings tool is, you may want to create a set of three custom properties for each unique meeting type (connect call, discovery call, first onboarding call, etc).
Once you’ve created your custom properties, you can move on to building your workflow. This is going to be a contact workflow, and the enrolment trigger is going to be a form submission. The form / forms that will enrol contacts in your workflow are the Meetings links for which you want to record the time and date values for.

The first step you (might) need to add to your workflow is a Delay for a set amount of time action, which you should set for one minute. This is optional, and to be honest, probably entirely unnecessary. It’s just a little redundancy action that I occasionally include when I’m building workflows that are dependent on object properties that have been recently updated, in order to make sure said properties have had time to populate.
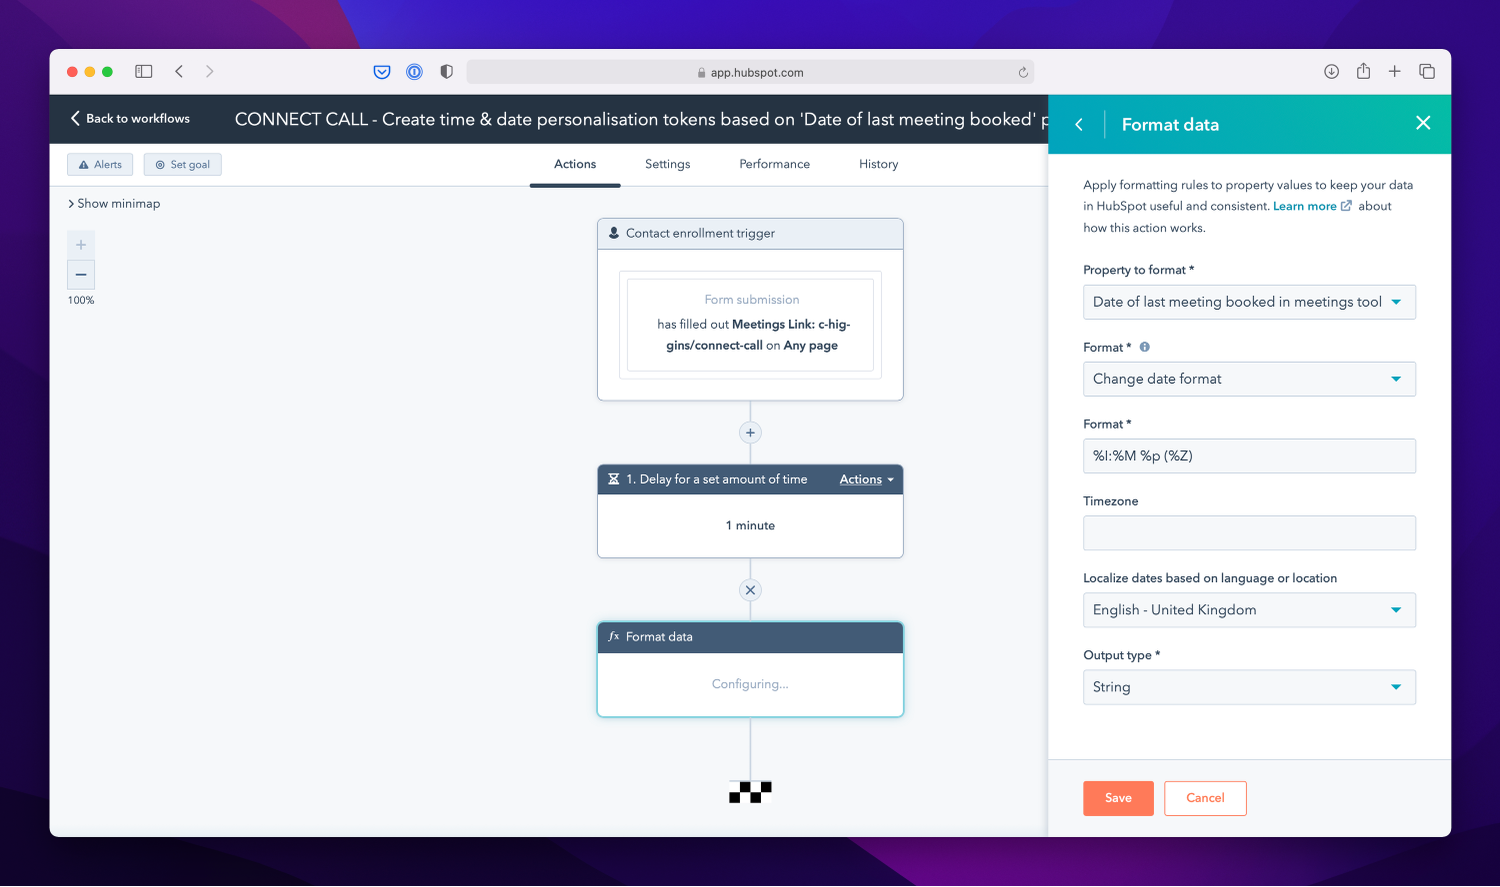
Next (or first, if you’ve recklessly disregarded the previous step 😉) you need to add a Format data action to your workflow. Under Property to format select ‘Date of last meeting booked in meetings tool’ and under Format choose ‘Change date format’.
You’ll then be prompted by another input field called Format, and in here you’ll enter the string “%I:%M %p (%Z)” (minus the quotes). This is HubL code (HubSpot’s programming language), and when rendered it will display the meeting time using the format “HH:MM AM/PM (Timezone)”. To finish this step, under Output type select ‘String’, and then hit save.
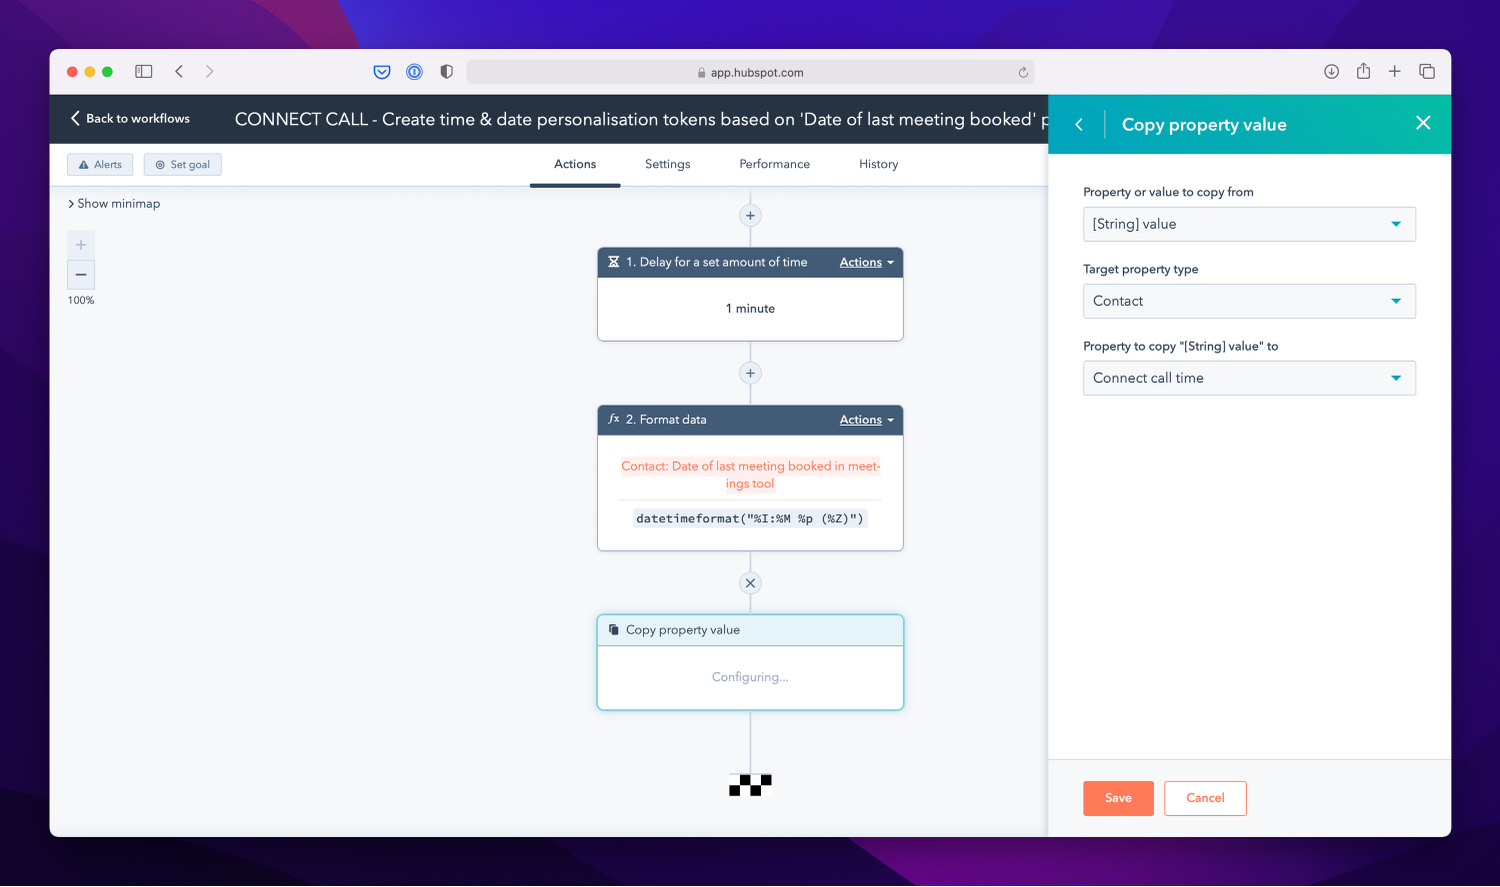
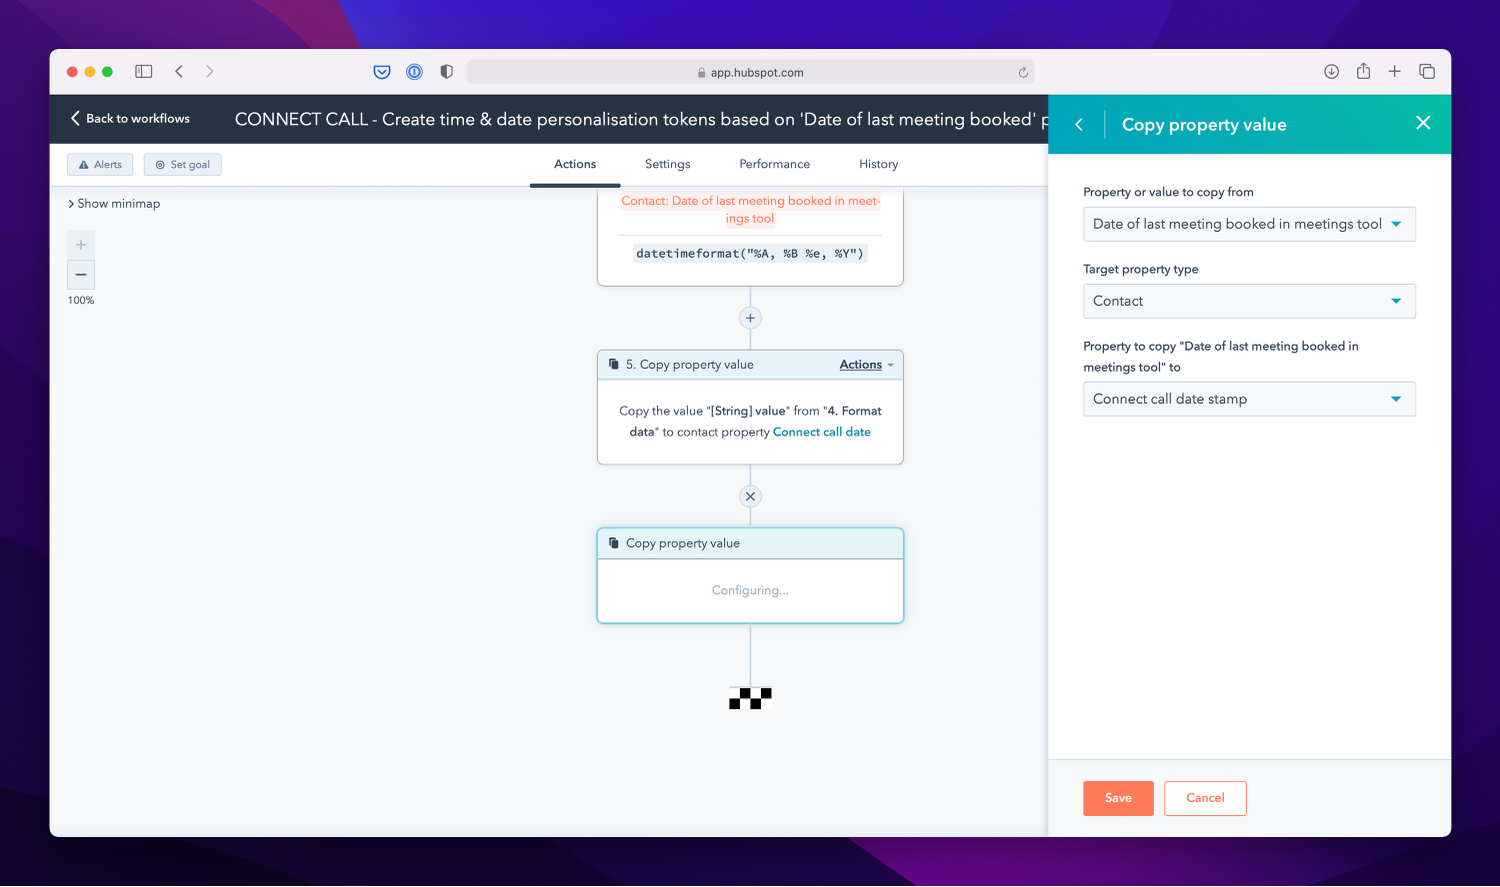
The previous step only formats the data, so next you’ll need to save your newly formatted value to the relevant property. At the time of writing, HubSpot prompts you to do this, but in the event that this doesn’t happen, you need to add a Copy property value action. The property you’re going to copy this value to is the Meeting time property you created earlier. Under Property or value to copy from select ‘[String] value’ (it’s under the Format data subheading in the dropdown), set the Target property type as ‘Contact’ and under Property to copy [String] value to select your Meeting time property.
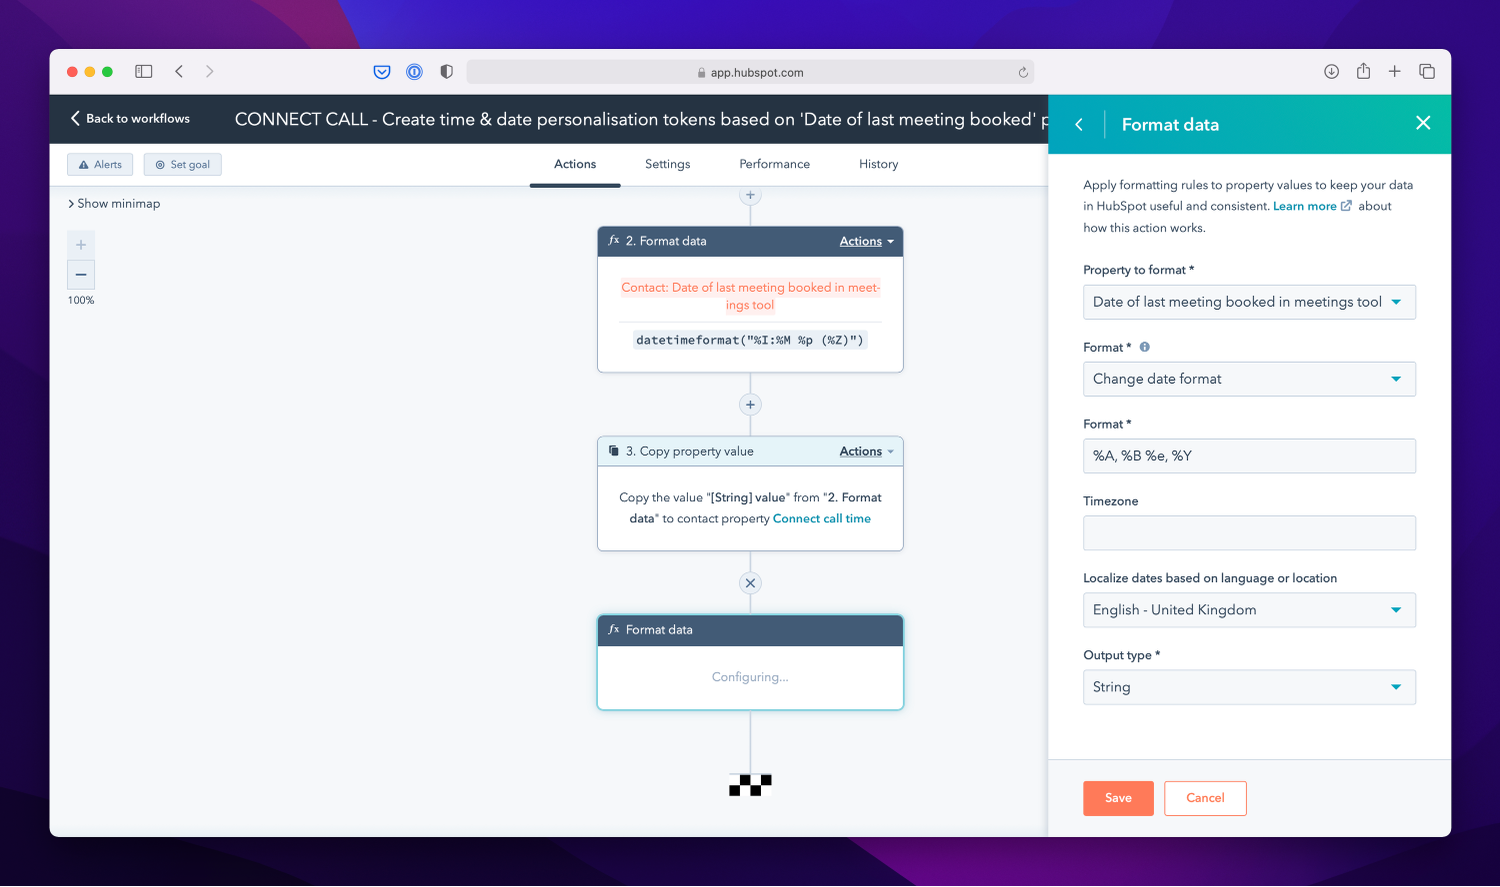
You now need to repeat the previous two steps, but this time for your Meeting date property. Add another Format data action, and as you did previously, under Property to format select ‘Date of last meeting booked in meetings tool’ and under Format select ‘Change date format’. Then under Format, enter “%A, %B %e, %Y”, which will ultimately render the meeting date using the format “Day, Month Date, Year”. Finally, select Output type ‘String’, and then hit save.
(If you’d prefer to define your own custom date and / or time format, you can learn more about the supported time and date filters available in HubL here.)
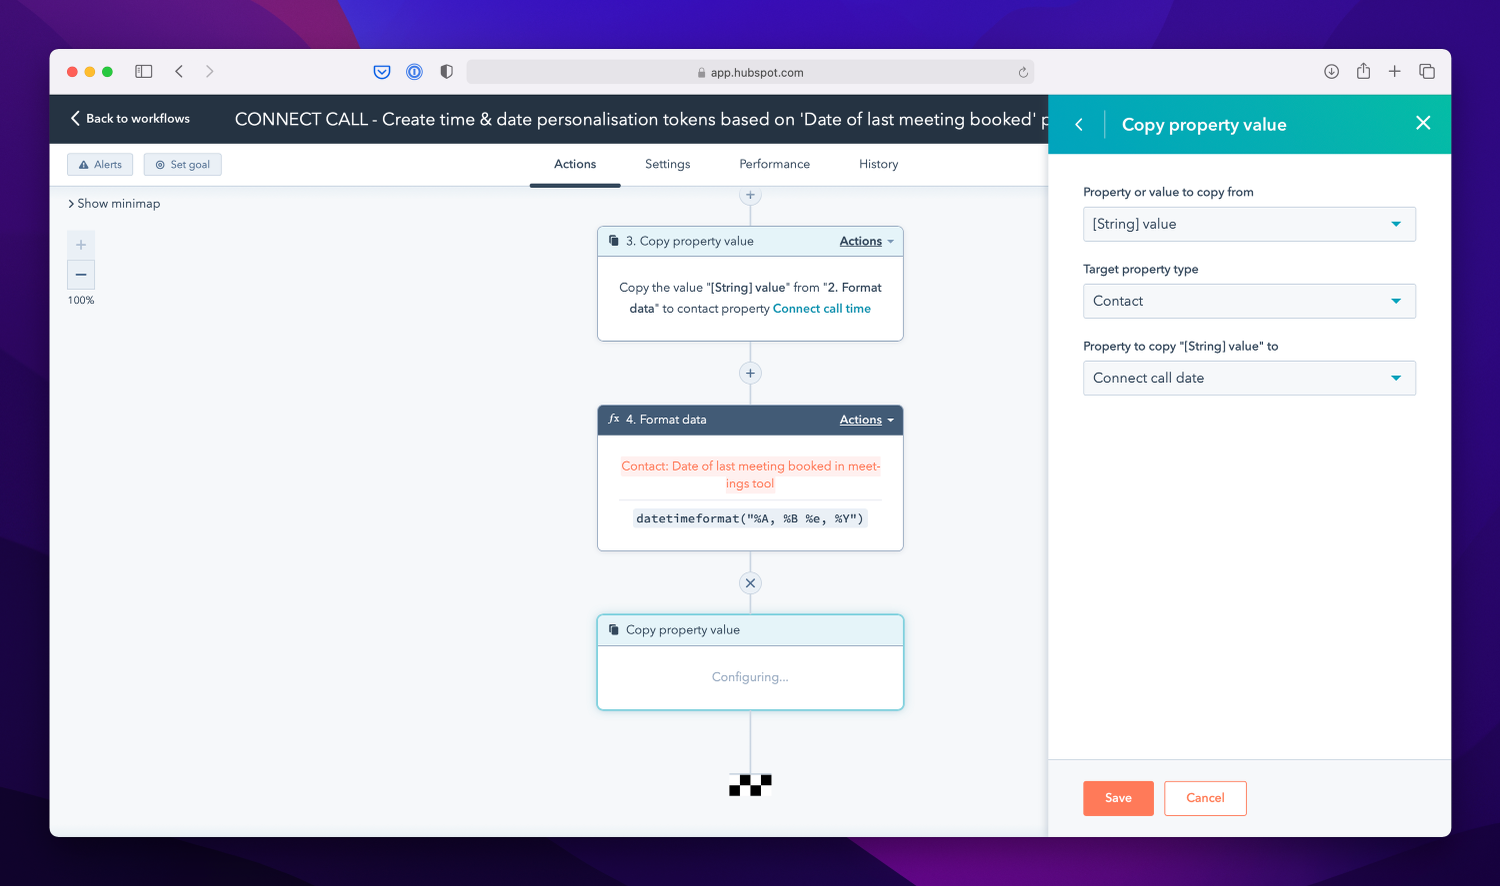
Next, add another Copy property value action. The property you’re going to copy the value from the last step to is your Meeting date property. Under Property or value to copy from select ‘[String] value’, set the Target property type as ‘Contact’ and under Property to copy [String] value to select your Meeting date property.
Finally, you need to add one last Copy property value action, which you’ll use to copy the value of the Date of last meeting booked in meetings tool property to your Meeting date stamp property. This is especially important if your leads / customers may book more than one meeting at a time, because the data in the Date of last meeting booked in meetings tool property is updated / overwritten with each new meeting booking.
To finish, head over to the Review page, enable workflow re-enrollment and then turn your workflow on (the orange Turn on button in the top right corner).
You’re now in a position where any contact who books a meeting via one of your chosen meeting links will be enrolled in this workflow, giving you a Meeting date and Meeting time property that contain the appropriately formatted text values for the meeting they booked. You can then use those two values as personalisation tokens in both marketing emails and template / sequences emails.
If you’d like to send out an automated email on the day of the meeting, you can also create a ‘Center on a date property’ contact workflow that uses “Meeting datestamp is known” as the enrolment trigger, and then fires out an email on the morning of the date stored in that property.
Limitations & gotchas
There are a couple of gotchas that you should definitely be mindful of when using this method.
Firstly, because the meeting time is stored as a plain text string, the time displayed when using the personalisation token will be local to the portal, not the contact receiving the email. This is fine if you only ever meet with people who are in the same region as you, but if not, it’s worth including the timezone so that anyone in a different region can easily convert to their local time. As already mentioned, you can include the time zone by adding “%Z” to your date format in the associated workflow step.
Secondly, if you’re using the aforementioned automated “morning of” email idea, there isn’t any kind of failsafe / redundancy built in if the meeting gets cancelled by either party. This means that unless a HubSpot user goes in and clears the Meeting datestamp property, the reminder email workflow will still trigger, despite the meeting having been cancelled.
In an ideal world, you’d be able to use the activity property Meeting start date as your workflow trigger, and specify a relative date (“today”) as opposed to a fixed date. Whilst this functionality doesn’t exist yet, there are several threads on the HubSpot Ideas forum about adding support for relative date filtering, so fingers crossed we see some progress on this soon.
Final thoughts
Although this method certainly gets the job done, it is by no means perfect. But hopefully it’s a useful hack that will suffice until HubSpot rollout a native solution.